


Sandane
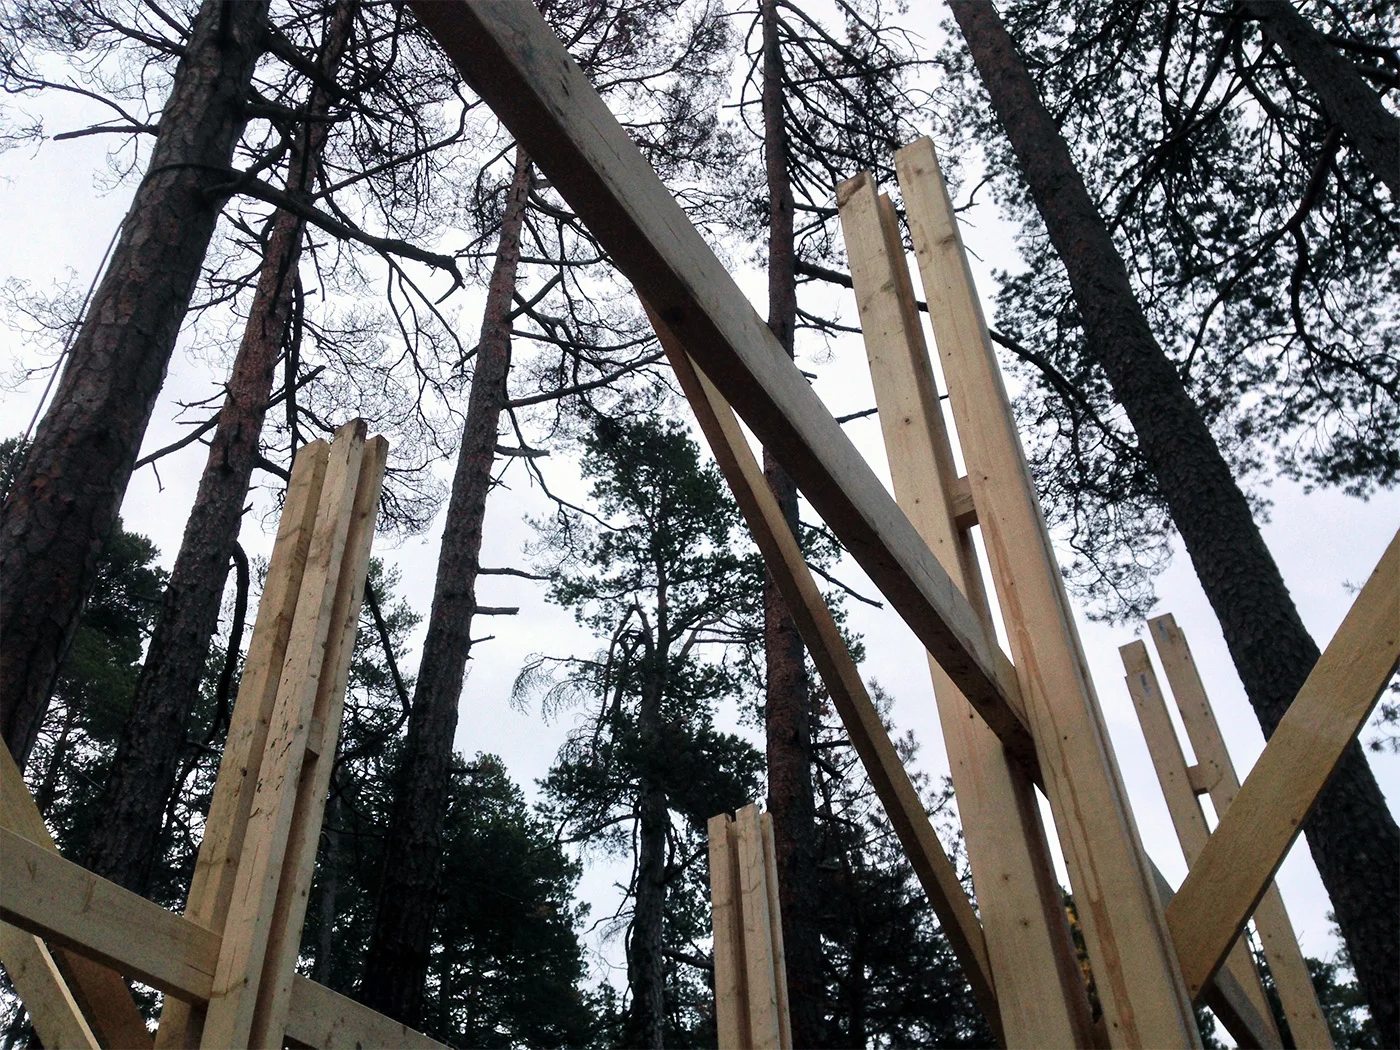
Construction of three outdoor sleeping shelters or 'Gapahuks' in the forest in Western Norway.
OK it has been a few weeks. Following the Sauna workshop, which is now over one month ago, we spent a couple of weeks in some sort of preparation for the Sandane workshop where we were to build some 'Gapahuks' or outdoor sleeping shelters. Each of us took turns with the workload as we all went on little trips around Norway. The work we did achieve took off from the design work I've previously discussed which generally arrived at a few detached shelters in the forest with sleeping above, a multipurpose storage / sitting / sleeping below and some platforms oriented around fireplaces. Discussion around spaces with differing levels of privacy. Here is the image again below.
So over the three weeks before the Sandane workshop we did some reworking of the layout between the trees, refined the dimensions for the structure in order to attain some quantities as well as some general preparation. The Grasshopper script previously designed for the proposed CNC milled foundations was somewhat discarded as their production was to blow out the budget. However as the design arrived at identical rectangular structures, the foundations no longer needed to accommodate separate complex junctions of which the script and CNC technology would be utilised. As such several foundations were made using the workshop CNC and the left over timber from the Sauna workshop by cutting pads with four insertion points for each column. Some plans were drawn up on Rhino to overcome excessive further discussion upon arriving on site and then we got ready to leave.
Then on Friday the 23rd of October we met at the workshop with a little panel van packed with tools and things, and a 9 seater van with students and bags, and drove the 10 or so hours to Sandane. Over the workshop we mostly stayed at a school close to the site which also had a workshop of which we could use. There was also a CLT production company close by of which we were hoping to attain some cheap materials, and another local mill of which we could get some free left over offcuts we could use for cladding. So on the Saturday we drove to the CLT factory, and took some free offcuts with fairly limited thought onto how were would use it as cladding and checked out the factory owners house under construction primarily of CLT.
Then the day after we got onto site. To get there we walked along a path for 10 or so minutes, which became muddier everyday, and immediately began to redesign or layout the units for the first time while actually being on site. I can say at least for myself that envisioning the site from the photographs and the 3D scan isn't really enough. How the edges of the site taper off, gauging the spaces in between the trees, proportion etc. So this is an important thing not to skip in the process, as everybody I'm sure already knew, as seeing these first hand altered our perception of the project. Perhaps this was an affordable exercise in an educational environment to reiterate such a thing. So we worked in a big group, measuring out sizes, discussing layouts, orientation, spaces in the between the shelters, opportunities such as the trees and rock face, view etc. This fairly quick discussion arrived at the removal of the proposed kitchen unit, initially located centrally as shown in the image above, and some reshuffling of the layout.
The following day we began shifting large rocks acting as foundations beneath the agreed upon columns. A couple of students prepared a frame which acted as a template to set out the foundations at the corners of each structure. So using this we made the large rocks square and level enough upon which to attached to columns of which others students were assembling back at the workshop. Once the columns began to arrive, we set the template in place, drilled through the prefabricated footings, removed these, set expansion bolts into the holes, then attached and bolted each column in place. The images below will explain this a bit better.
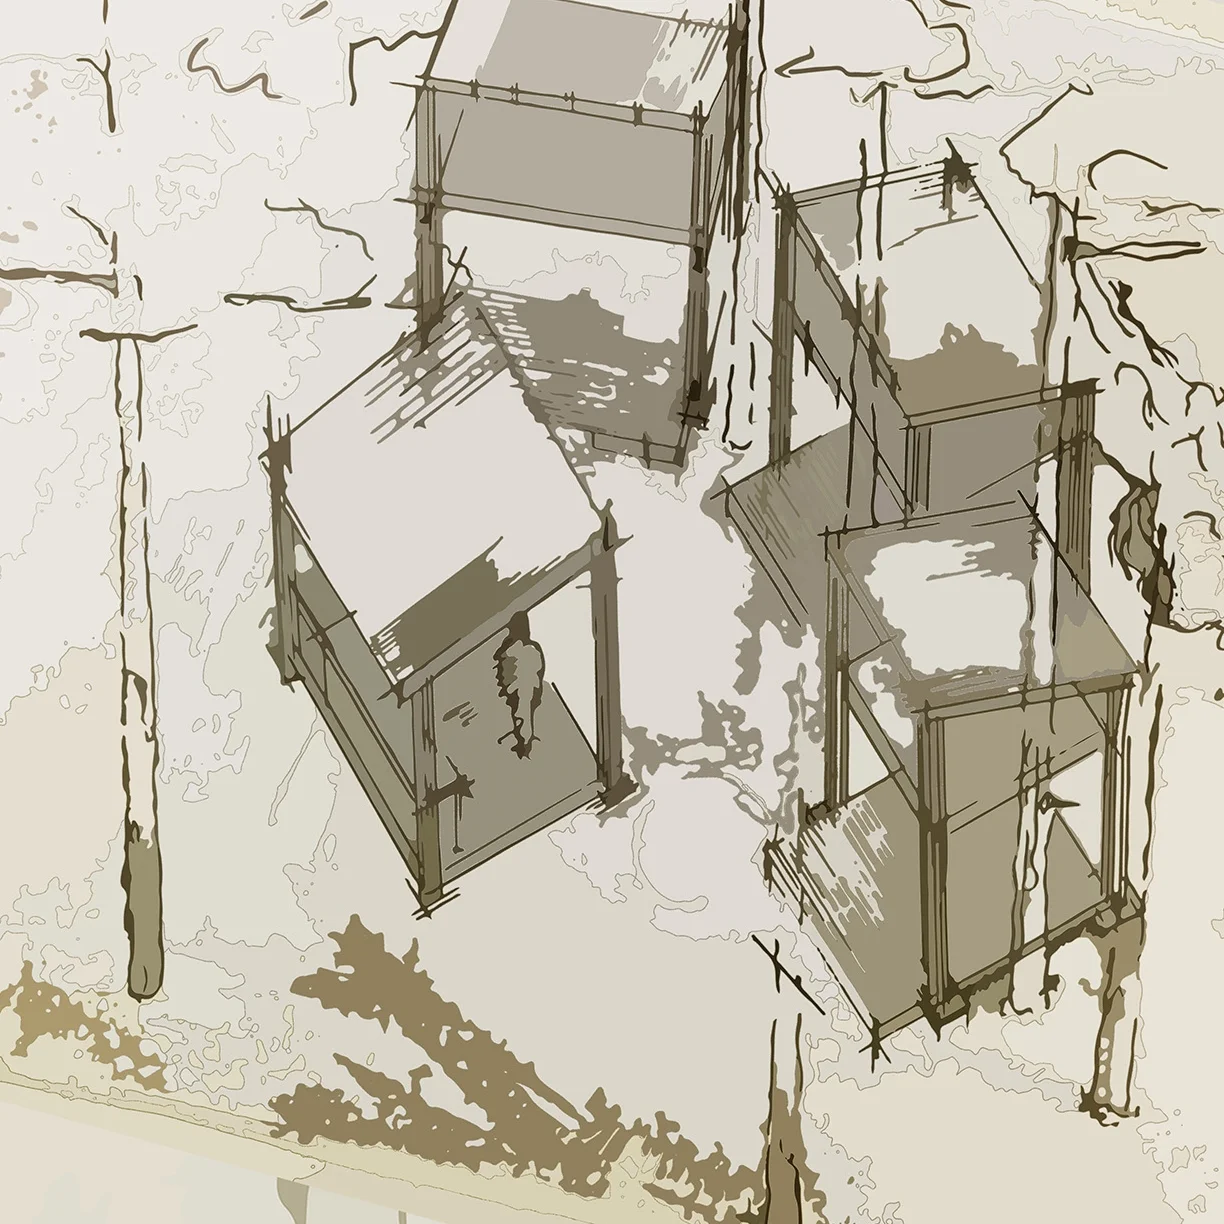
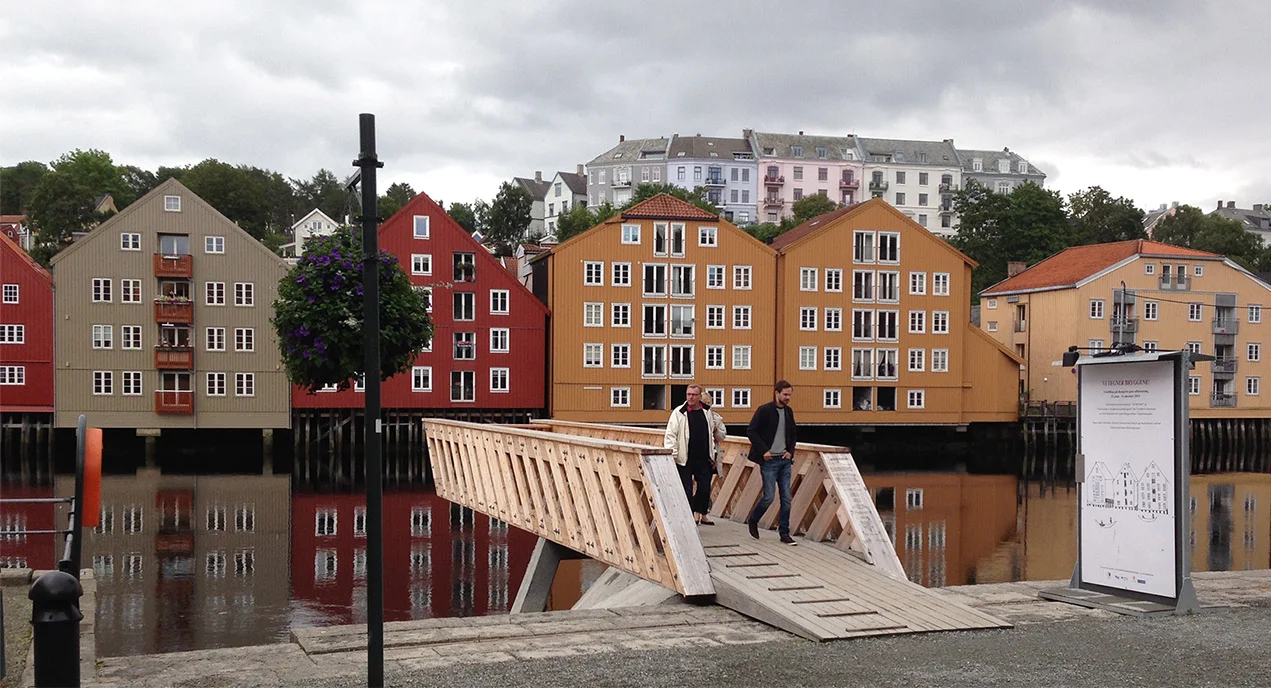
So without going into it day by day some major decisions we made throughout the workshop, additionally to the aforementioned set out, included the upper and lower levels of each platform, roof height and orientation and the cladding for each unit. As the columns began to go up the first shelter arranged its floor levels with fairly similar dimensions to those initially proposed. The second and third shelters however shifted in response to the first and the surrounding landscape. The image below gives insight into the new layout although it does skip a few steps in the construction process. Very poor quality panorama but further images should explain the project better.
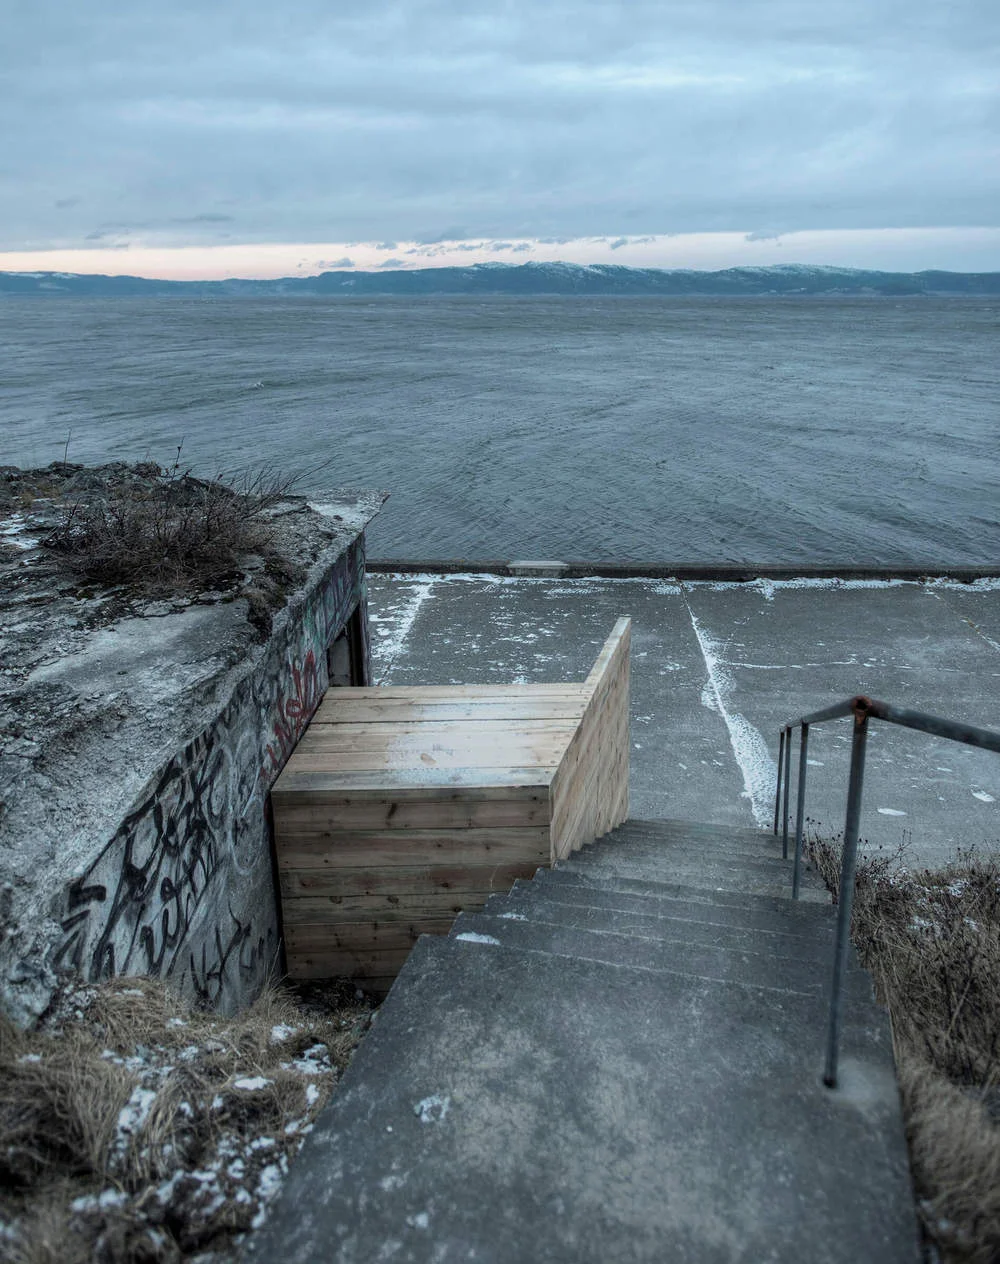
Generally each shelter was constructed by three separate groups organised fairly automatically which shifted a bit here and there. Across all groups discussions revolved around proposed use of the ground floor, Australian ground floor that is (Norwegian first floor), which dictated the height of the 'first floor' above. Whether that be sitting, sleeping, storage etc. The roof on the first unit on the left was oriented towards the second unit in response to the intimate space unfolding between them. This orientation also aimed to provide shelter from the wind which was told to come from the fjord as seen in the photo above. This platforms consisted of two 2"x6" bearers that ran through the centre of the columns and 2"x6" floor joints at 600 centres projecting out past the bearers where necessary to create some little platforms and sitting areas around the fire. The roof on the central shelter was pitched the opposite direction upon the realisation that 'first floor' beams that had been projected and secured to the rock face for bracing actually provided an interesting alternate access to the top of the rear embankment. As this played out the third unit, of which I was primarily involved, seemed to muck around with quite a few experimental changes. As the space in between the trees was limited the footprint was reduced early on then due to the vertical nature of several surrounding trees the height was increased to give a more vertical nature by increasing the 'first floor' level and in tern ground floor ceiling height which also enabled individual use. This also required a ladder made of round timber members protruding from the column beside the tree. Additional bits included a fire wood box on the side with minimal eaves on the sides responded as what seemed appropriate throughout construction to surrounding trees and form. Each of the ground level platforms and roofs surrounded one tree which was a nice little extra.
The final work for the project was the cladding for each shelter. The material that was made available to us included the scrap CLT and natural tree offcuts mentioned previously, but also some thin timber strips which were weaved to create this quite nice refined Japanese aesthetic. Initially we had thought to ration the the materials between each unit, with a mix of cladding but at one point an idea came up to give each unit one of each type. Initially I wasn't too sure but once you have a think and look at something for a while I was all about it. The tree house, the tea house and the rude word that got given to the CLT house. There was limited amount of material available and each "team" had to utilise it efficiently. The CLT was split even further to get more surface area which were then compiled like bricks with ins and outs for aesthetic and shelving. The team on the 'tea house' (stupid names we came up with at some point by the way) clad two walls on the top and bottom oriented to surrounding spaces. All the walls they made were very nice particularly in the short amount of time available. Then finally the tapered tree face offcuts on the 'tree house' had to be staggered due to their natural taper, marked out and cut with a chainsaw to fit and despite this did so fairly well. Id imagine some looking at the final project might have some trepidation with these materials but it was simply what was available and because of this makes it all the more nicer.
What I thought.
So we sat down on the last day and everyone had a turn at expressing their thoughts on the project in order to encourage a little reflection. What everyone enjoyed, successes, mistakes. For me the group work was another thing that I need to continually work on. Taking time to consider every point made by others, being open to suggestions and passing on thoughts without being opinionated. I'm not painting myself the best but they were just thoughts I had. Pasi made a suggestion to consider moments and decisions and as to which are individual, small and entire group decisions. How to know when to come back and discuss things and when to push forward. He made reference to situations in the past where because of the constant discussion back and forth no actual work was done.
Then the building was simply building really. It was nice to do and it was surprising that the decisions were largely our own. Pasi and Sami would of course provide some guidance here and there, make design suggestions in our discussions, but we would push forward with everything as we saw fit. The aforementioned decisions of the floor levels, roof orientation, platforms and cladding in the end were our own. I even found myself needing a little guidance, particularly with our 'experimental' structure, not wanting to make concrete decisions that were wrong, done and irreversible. But I found there was a time to go with the flow and not be too insistent with all the contest. Being self designed and constructed whether some of these were wrong most definitely could be insisted, but in an educational environment it is nice to have such a luxury and be able to reflect upon it.
So this was a good exercise in construction and design. Project work encompassing greater learning would include factors of project economics, logistics, greater client liaison etc. with further matters where relevant, however the timeframe was a factor.
Sauna Workshop
Sauna workshop. Construction of a sauna within a storage bunker from WWII over a two week period in Trondheim Norway.
As stated previously we had solely discussed some ideas for this project prior to arriving on site. So on the first day, once we had cleaned and removed some soil and rubble within and around the bunker, we began to sketch some ideas for the project. Working the same as previously we started sketching individually, then coming together to chat about some ideas, breaking apart again in smaller groups, then bigger groups and by the end of the second day we had a floor plan pretty close to what we ended up building. We arrived on site on Monday the 21st of September and finished the main structure of the Sauna on Saturday the 3rd.
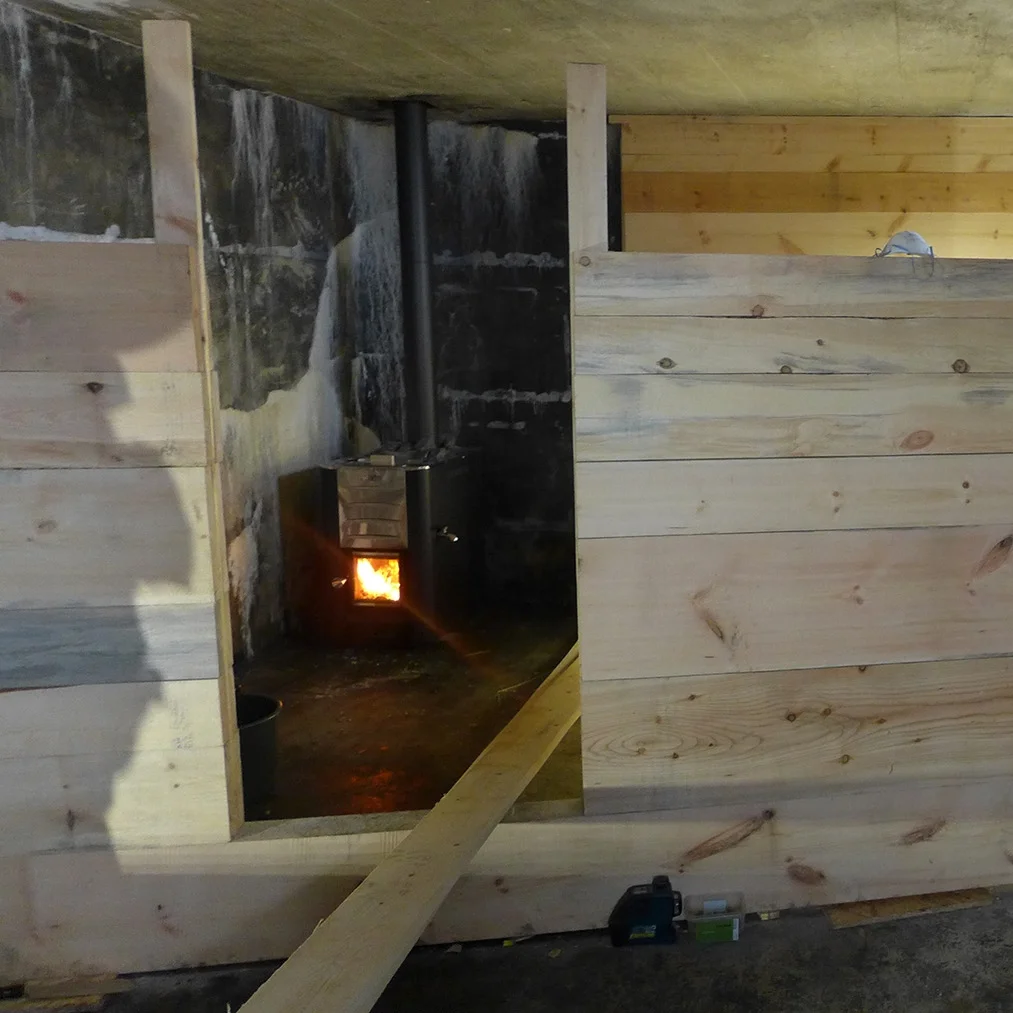
Being that this was primarily an internal project, we had to work within a defined framework and as our drawings progressed certain elements began to inform the design. The plans became simpler with each round which initially explored making openings in the bunker in different ways. Being that we were building this thing in two weeks, and that bunkers are made to be solid, reducing these would give us more time for other things. So by the end of the day we had a floor plan for the sauna with one continuous wall defining three spaces with an existing external opening, or some natural light, each. The door for the first room, one window to the second room and the other into the sauna at the rear. At the rear of the bunker an existing opening within the ceiling space indicated a rational location for the fireplace.
For two days of the first week three of us went to a saw mill and cut up all the timber we needed for the project. Two of us operated the machine below and the third was moving the timber around and calculating how much we needed for the project based of these preliminary plans made the day before.
Meanwhile the remaining students worked bolting battens into the walls of the bunker of which the large timber walls were to run along.
Once back on site we had to develop a system for joining all the pieces of timber together. Again each student had a go at designing details for the timber to meet at the corners. The timber we cut at the mill was approximately all the same width, although the heights of each piece were different. The timber joints therefore had to cut right through each piece in plan as one piece of timber might interact with two pieces in an adjacent wall. Sami suggested a simple frame joint at the corners with a butterfly type pin holding them together, as it would be easy, however another student outlined that this would require one layer of all internal walls needing to be placed at once in order to hit each butterfly pin in. As seen below there were to be 6 internal walls, so instead of having to build all these layer by layer, as opposed to completing each wall at the back of the bunker first, simple timber joints were designed to hold each adjacent wall which would be able to be placed from the sides. Therefore one wall could be built, then the next and so on. This should be clearer in the photos. These were then made into 1:1 reference templates.
Then we started to make them. After the first joint was made it was redesigned, as were most of the others, so it was a little quicker to make. The bottom members were elevated from the floor with small pieces of perspex to permit water to flow to the front door. Being that the timber was going to be exposed to a significant amount of moisture, another change was to route a groove into the top and bottom of each piece which would be fitted with a short strip of timber. We initially thought we would secure each piece of timbers to the battens but this would restrict movement and it would crack. I put this little mishap down to an oversight of the behaviour of timber rather than particular site interaction and experience, over studio work, permitting the change. Maybe seeing this happen at 1:1 will make me think about it more in the future.
Making timber joints continued over the next week and was my primary job, along with a bunch of others. Using oversized circular saws and chisels we made these corner joints as well as others at the doors. A couple of students managed which timber pieces were to go where in order to get the most out of the limited supply we had and others spent more time within the bunker putting them all in place. The top most piece on each wall had a little detail which allowed it to stay attached to the roof, detached from the rest of the wall to permit movement. Things that were screwed in were hidden with timber plugs. Roles shifted here and there by what was available.
These students below also began to work on an outdoor seat and wall which was to reflect the design inside. This was begun once the platform within the bunker was made and therefore constructed in reference to this. The platform within the Sauna was designed on the spot and this outdoor area followed suit based of scale and enclosure.
We continued finishing all the walls while a few of the girls made some removable platforms which sat in the cross members within the sauna room as shown in the photos above. Another couple of students worked installing two sliding doors to the sauna and a window unit which were made at theUni workshop through the week. We will continue working on other bits and pieces over the next couple of weeks including stools, coat hangers, shelving and the like and some more photos should follow.
What I thought of the workshop:
At the beginning of the workshop there were some periods where I felt a little aimless which began to change once everyone settled into particular roles during the second week. I was questioning as to whether some more direct instruction may have facilitated a little more even education. A student who is a qualified carpenter very much took charge which I initially wondered as to whether it was getting in the way of other students trying these things for themselves. As the workshop went on though it was such agency, brought about in all the students, which was an important trait to develop working through such practical matters.
Further on I began to think about how such workshops operate, whether that be being run exactly as a worksite where perhaps it is primarily results that matter, and potentially sufficient teaching of apprentices, or still very much an educational environment. Fabricating a worksite environment however may be detrimental to matters of indirect or implicit learning such as the observation of the aforementioned carpenters work, but I did believe that some direct instructional matters do need to coexist throughout the process. The levels of how these coexist may simply be the difference between various apprentices education or lack of on worksites. It eventually dawned on me not not be overly concerned with these matters too early as these matters seem to sort themselves out.
That aside, was the work we did do, which was primarily making timber joints, not so time consuming the project may have gone in a different direction. Were a simpler means utilised perhaps more time would have been available for additional external structures, as we had initially discussed. But it's interesting the see the open manner in which these workshop are approached in that many final results may have come about, particularly because the joint design was such a quickly made decision. Although final images are still to come it was a good result, but there would definitely been other ways in which to do it. Knowing what it is appropriate and how to move forward enables a good dialogue between creative nature of designing bits and practical nature of getting things done.
It was nice to source, prepare and install the timber. Working at the mill, seeing Vegard and Nikolas (two students) managing how the timber was to be implemented, cutting it to lengths, preparing joints then finally installing it in the sauna, allowed a continual perspective of timber at each stage of it's use.
At the end of each day we would play a bit of Basse, a local Trønder game.... maybe throw some rocks.
Third Week - Sandane Design
Design and grasshopper in preparation for the Sandane workshop.
Despite the minimal preparations we have made for the the 'Sauna' workshop starting next week, we spent all THIS week designing the Sandane shelters. The Sandane project brief requests public shelter within a camping and hiking area in Western Norway to accommodate 30 students at a time. A previous shelter in the area had recently burnt down, as shown below, damaging some existing trees in the process.
As explained previously the Sandane project aims to utilise digital modelling and prefabrication to assist during the construction process. This being the major difference between it and the Sauna workshops and as such, design and preparations need to be made prior to commencement on site. Starting next week we head down to the aforementioned Bunkers to begin designing and constructing on site for the Sauna project for 2 weeks. This intuitive form of design and construct has been undertaken by Sami and Pasi enough previously that although it remains fairly ambiguous as to what is to happen, they have enough experience in the process to lay aside any uncertainty. They have stated that over designing prior to construction is not the always the best way to approach a project.
Over the past few weeks Pasi has been keeping us updated with meetings he has been having with heritage departments, the municipality and the recreational group who will be running the Sauna. Although we haven't designed anything significant at present, Pasi has made and gained approval for certain requests despite being somewhat vague. These include that we are constructing a sauna, which bunker we are using and also a zone for potential external structures. We had previously discussed constructing something on top of the bunker but this wasn't advised. But we'll see what has happened in a couple of weeks I guess.
But for the meantime onto the Sandane project.
We spent the week moving between different forms of work, individual and group, sketch design to grasshopper, and by the end of the week we had settled into areas of which maybe we felt a little more comfortable. But we all began the week together with some individual sketching, various analysis techniques and ideas about the project. Through this we came up with some key terms that were popping up between out ideas, as shown below and Pasi assisted in refining these down to common conceptual ideas. This generally was based around structures where sleeping was happening in a second level with more ambiguous storage / resting / sleeping platform underneath. In terms of the project's layout on site, by the second day this form was being explored in four ways, as a circular plan, two masses facing one another, an individual mass and a cluster arrangement. All of these were to be potentially focussed around a fire with discussions of community, privacy, add ons etc.
Within these four 'concepts' we then switched into a fairly objective analysis of each identifying quantities of floor and wall area and footings to identify a certain rational selection of each idea. Being that the project is actually going to be built, It was found that the circular and the larger mass concepts required a much greater floor area and structural size to make them work. As such they were dropped and the 'two masses' and 'cluster' arrangements were explored further. This analysis aimed to lay a framework for the project to set a certain scope in terms objective factors of cost and the like. The architecture and creativity could then proceed from this with fairly rational foundations.
We moved forwards again in small groups, coming back together to make decisions. Using a 3D scan that surveyed the site over the previous weekend, an exact siting of the project was argued and massaged into a position through a group discussion. It was surprising that from 13 perspectives a decision was made upon a preliminary massing and siting fairly quickly. This can be seen below.
We again worked in small groups on grasshopper to explore how a structural framework may work for this preliminary footprint. One group wrote script for a mesh type floor structure of triangular connections, another plotted the points on the 3d scan and a third group explored how individual foundations with many connections could adapt to one another.
The last few days of the week the groups divided in a sense to one working on the grasshopper script and another working on design. The design ended up in a cluster like form with sleeping units along a rock wall and a more open central kitchen structure. The floor of the sleeping units were to be around 2000mm from ground level with a low roof overhead. A platform underneath these would permit storage and further sleeping areas if required. The fire place ground level platforms around the units were pushed and pulled to create external spaces and to fit around existing trees. Some drawings below.
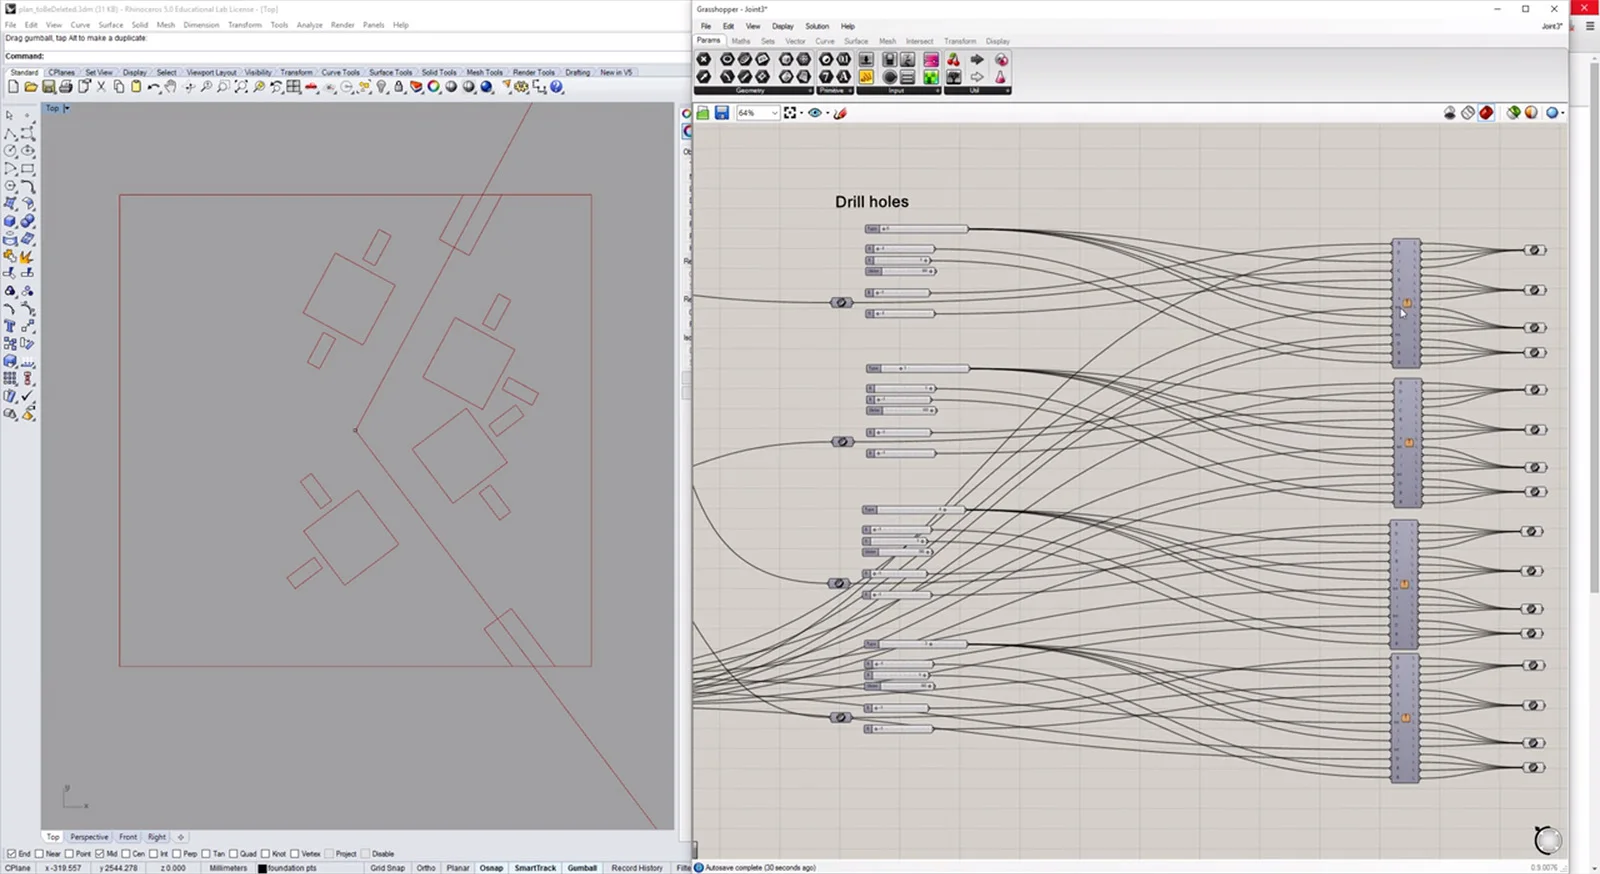
Though these still remain preliminary, the aim of this week was to establish fairly exact locations for the foundations as these are the elements that are to be prefabricated. The design will be able to shift following the Sauna workshop but the manufacturers require a certain scope of works early to get a gauge of the workload. These foundations are to be made of 800mm x 800mm x 120mm cross laminated timber pieces which will be placed at junctions and prefabricated or cut to accommodate columns and beams. The entire structure is to rest on these junctions which will sit on further foundations.
This is what the grasshopper script below is trying to achieve. Some fairly competent grasshopper users in the class developed this throughout the week and prepared the little video below. This will provide a little more insight into how these programs communicate with one another. You can see that the segments of foundation, indicated by the larger squares in plan, are to accommodate columns, intersecting beams at varying angles, can be adjusted and will adapt to surrounding changes. I can see the rationale for parametric design in a form like this, which I believed prior, with my limited understanding, was largely or solely devoted to form finding.
Second Week
Workshop Introductions, Grasshopper, Rhinocam and CNC.
The second week was just spent mucking around really. Throughout the week we went back and forth from studio to the workshop getting to know new programs on the computer then making them to talk to different machines. Two of these days we were told more or less to simply make stuff and get accustomed with using some tools. Initially we were instructed to make some benches and things for the 'Sauna' workshop but this just turned into everyone just making stools and some other personal bits and pieces - I made a couple of bed side tables. Plus all the timber in the workshop is free to use over here in Norway. They seem to have plenty around.
Leading up to the course we had to school ourselves on Rhino and a couple of plugins called Grasshopper and Rhinocam, all of which I had zero experience with. There is only so much that stays imprinted in your brain from following tutorials so it was good to see Pasi walking us through some basic Grasshopper during the week. Again I don't know too much about these but Rhino is seemingly just another modelling program which operates a little differently and Grasshopper is an 'algorithmic modelling plug-in'. So to me this seems like writing code in a sense from which you can build and process models. You do this however not with script but using little icons which each have different parameters for storing and process data and get connected sequentially. You'l most probably have to watch a video to gauged this properly, however, although it may mean nothing to you, here is a little screen shot of me working with Rhino and Grasshopper working side by side.
As the course goes on I should be able to explain this a little better. We had a look at how these programs talked to the laser cutter and the CNC router.
Here are another couple of photo of Pasi, after running us through these fairly complex modelling programs, cutting up some logs with a saw mill they had just put together. Pretty good range I thought.
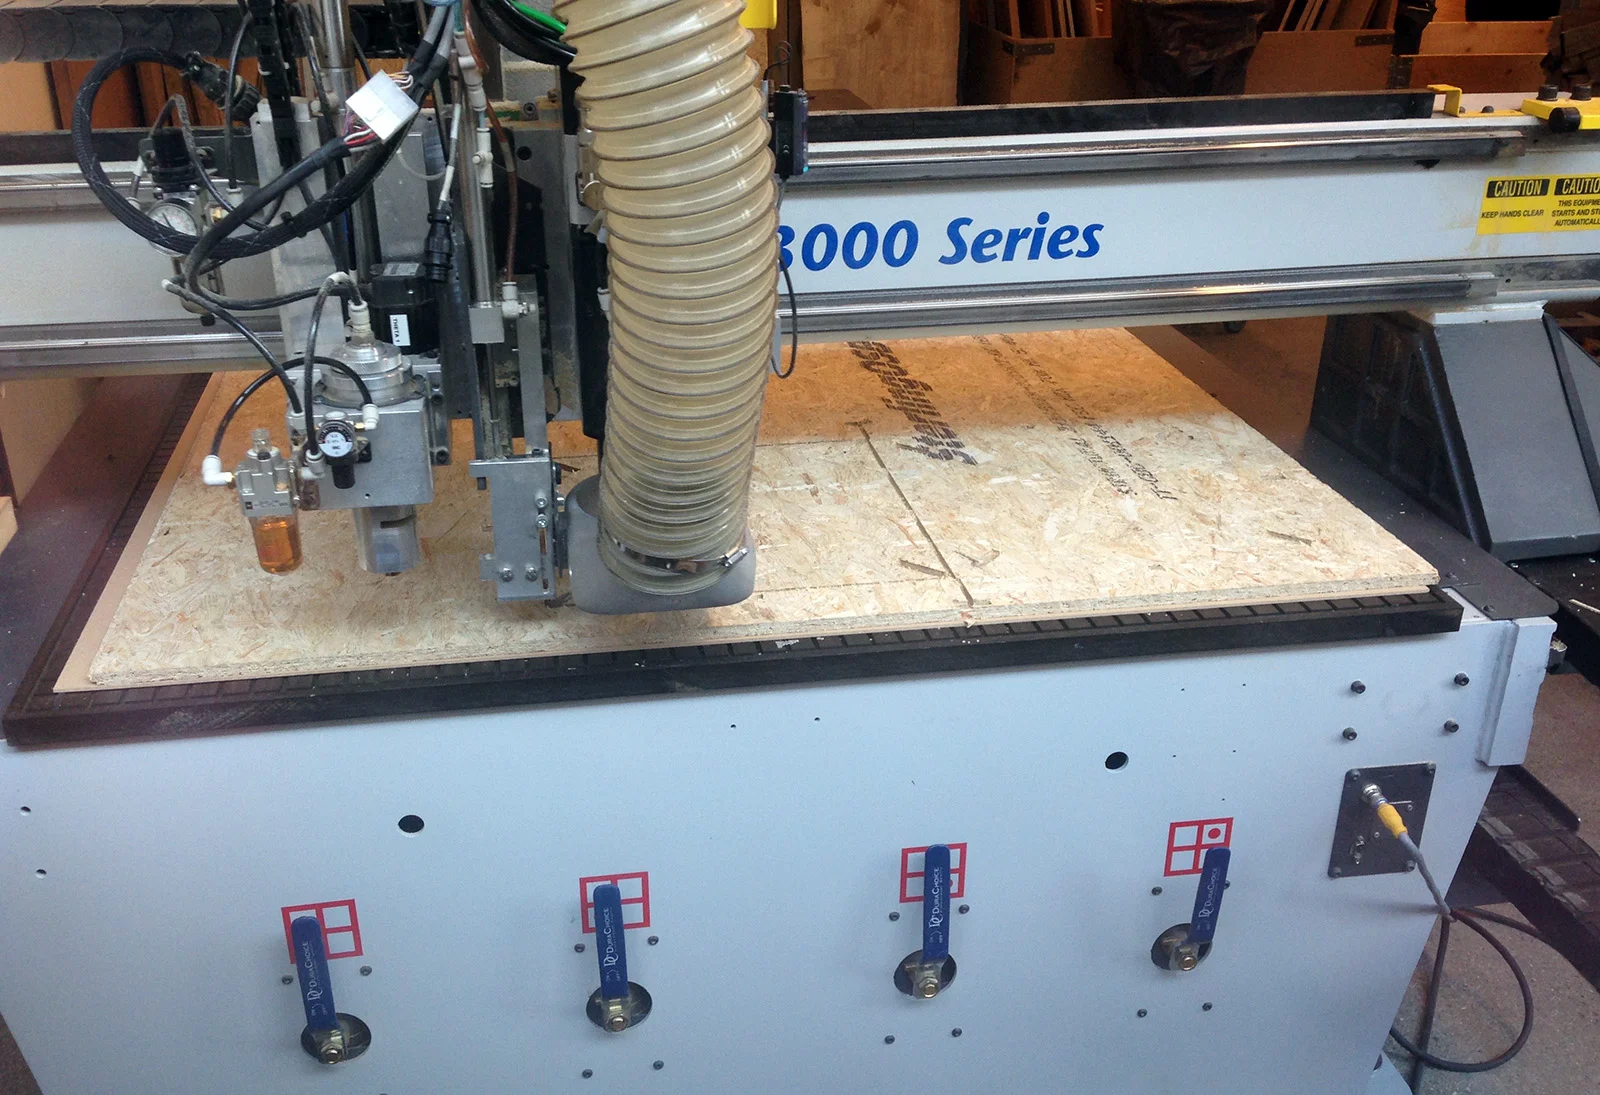
The final day of the week we worked with another plugin for Rhino called Rhinocam which coordinates the operation of a CNC while milling a project. So say you have a bunch of lines drawn in Rhino you can input information onto these lines to coordinate the CNC to cut these at different speeds, depths and with different router or drill bits. So this is what we did with Steinar, another tutor on the course, initially working in groups trying to design a little flat pack stool in 2D.
The two Swede girls came up with a little stool design and Steiner walked us through Rhinocam giving each line some direction for the CNC. Things we had to consider included the fact the router is unable to completely cut out square corners so had to input another little drilled hole in each corner to get the timber out. We watched the CNC working cutting a sheet up and we then pieced it together. It was interesting seeing a certain reflection on their design, after a bit of struggle to get it together, which could have used a little more thought on process of assembly as we relied on a little flex in the material to make it fit. Additionally to this, that it could have used a little adjustment with how the corners on the stool ended up and some other little aesthetic things. To me it seemed that working through this process, actually doing it and seeing it finished is what allowed such reflection.
First Week
Introductions and sauna site visit
First Week
Alluded towards leading up to the first week and then confirmed on the first day, the Kosovo project was called off. The embassy in Kosovo still hadn’t processed the application only a few weeks out from supposed commencement, as such funding had not come through and the plug had to be pulled. This was disappointing as it was one of the major draw cards for coming to Norway however an alternative came about fairly quickly. I’ll get into that in a second.
So on Monday the 31st of August the class, consisting of 13 students, met for the first time with two of our teachers, Pasi Aalto and Sami Rintala. The students included one Australian (myself), one Austrian, one Swiss, one French, one Icelander, two Swedes, the remainder Norwegians and both Pasi and Sami from Finland. Here we just had some introductions, outlining our favourite foods, mine being anything with vegemite, and a couple of quick presentations from Sami and Pasi. Sami describing his approach to Architecture, past studios and his work within ‘Rintala Eggertsson Architects’, and Pasi followed outlining properties of, and his obsession with, Norwegian timbers.
As I touched on earlier an alternative to Kosovo came in the form of another site within Trondheim, which is where we headed the second day. After a walk through the city we headed along the coast to a point jutting out into the water, or ‘the Fjord’, as shown below.

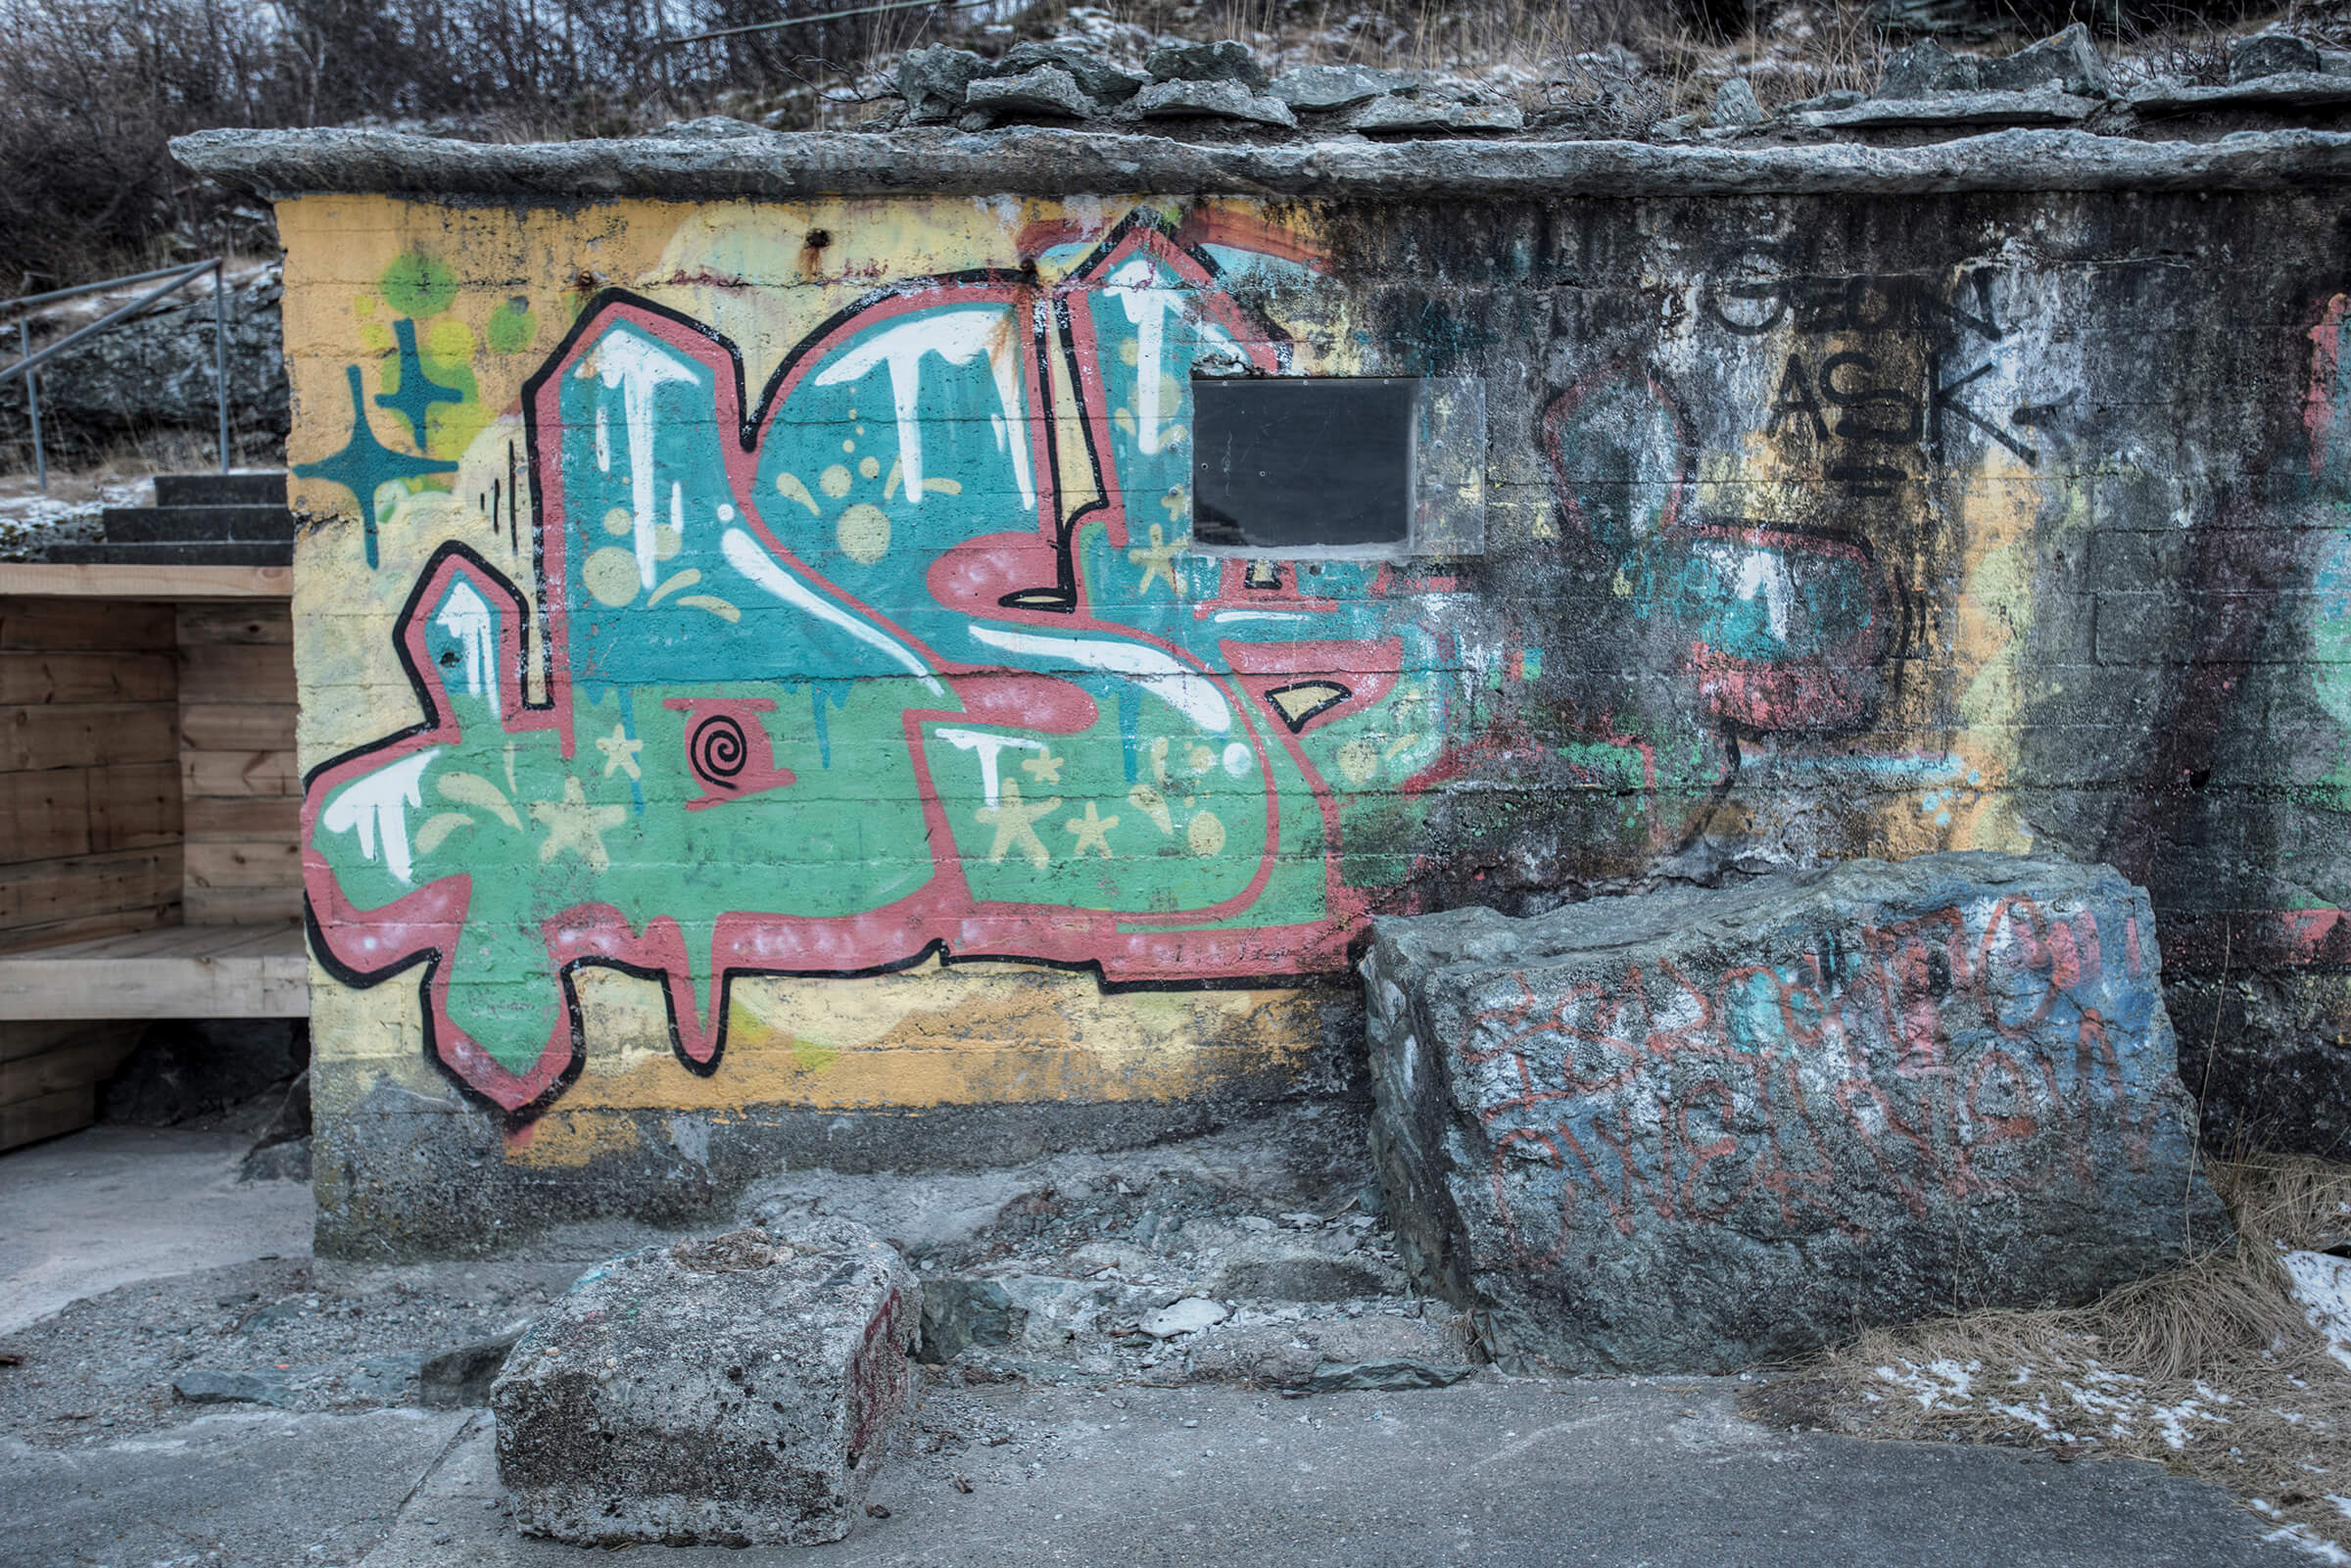
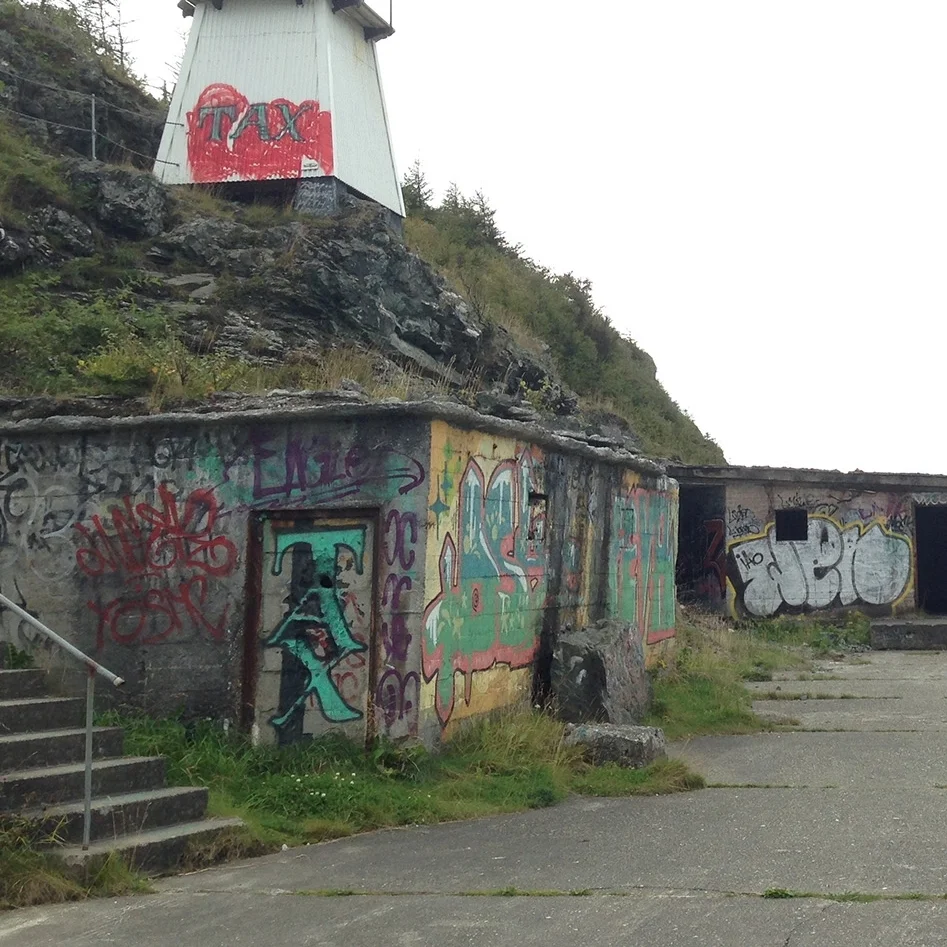
We arrived here to a group of old storage bunkers, somewhat imbedded in the base of this headland, built by the Germans in the Second World War. It is within one of these bunkers that we will be constructing, true to Scandinavian tradition, a sauna and potentially some other external structures. The site came about as it has been as contentious issue in recent years as difficulties with vandalism to surrounding buildings and ‘underground’ parties within the bunkers have lead to all the structures very nearly being demolished by the municipality. Following intervention by the public this was stopped and revitalisation has since begun in the area including these two timber buildings being converted into a restaurant and a recreational building of sorts. These are shown below with remnants of a little more vandalism made along the way.

To find a reference point, the little docking area on the left of the photo above can be seen in the earlier satellite photos. Now turning 180 degrees from this photo we see the bunkers shown below. Some big, some small, all covered in spray paint in quite an interesting spot. At this stage the sauna is proposed to be used by Kayakers who will be running the aforementioned recreational building, local fisherman, joggers and the like. This sauna will be in the very first bunker on the left, which is also the smallest and most probably easiest to be monitored by the adjacent buildings.
The following day a previous student at NTNU presented her masters thesis, which had investigated a revitalisation of the area. Following hearing about council’s desire to remove or fill in the bunkers, herself and Carla Carvalho - the third tutor for our course - approached the municipality and put forward the idea for the sauna. Following the presentation the rest of the day was spent sketching and exploring some ideas for the project. We had ideas of external structures mediating privacy measures between the sauna and the outside. Saunas are commonly used by people wearing no clothing who spend time moving between the hot and cold, inside and outside of the sauna.
The last day of the week we headed along to ALLSKOG a sustainable forest management company, which runs forests throughout the northern half of Norway. Following a presentation about the industry and all the benefits of using timber in Norway we headed to a forest to watch some tress getting taken down. We walked up into the forest and watched the contractor below operating his own equipment, pulling spruce trees out of the ground, turning them on end, pulling them along while ripping off all the branches and chopping them into pre determined lengths. About 10 seconds or so per tree.
This first hand reference to timber production was intended to inform us on the necessity to be aware of the origins of timber and realistic when specifying potentially unrealistic lengths and quantities.
So generally a introductory week.
Trondheim, Norway
First post from Norway.
Hello.
Ashley Menegon here writing from Trondheim, Norway.
Firstly I want to reiterate that I have set up this blog to outline my experience while undertaking a semester exchange here in Norway. The main aim of exchange was to embed myself within more practical models of Architectural Education.
The reason why I started investigating a potential semester exchange at 'NTNU: Norwegian University of Science and Technology' was due to an awareness of the architecture practice TYIN. TYIN spoke in Sydney a couple of years ago at an Affirmative Architecture conference which I actually ended up missing… but I have had my eye on them since.
TYIN was established by two Architecture students prior to the completion of their education at NTNU, with their first projects entailing built works in Thailand and other such under privileged areas. A book entitled ‘Behind the Lines’ outlines the multifaceted learning facilitated through these experiences. It was through NTNU however that such an approach was initially nurtured. For the past 12 years NTNU has been facilitating or assisting students with achieving their own built projects and it was for this reason that I wanted to gain a place and somehow get involved. I have also been preparing a thesis this year to analyse the nature of such experiential learning however I’ll get into this a little later.
The particular course I was aiming for was comprised of two courses entitled ‘Design in Context’ and ‘Digital Modelling and Fabrication’... The initial proposal for the course was to complete three projects. Two projects resulting in built works - one utilising minimal technology whilst building on site, the second a pre-fabricated structure utilising BIM and CNC technologies - and a third design based project. Initially my thesis was going to focus on how these quite different construction environments facilitated learning in different ways, which is still does, however has shifted a little, as has the course. The images below give an idea of the initial course structure.
But I was accepted as per my first post and headed to Norway on the 21st of July. Since arriving I took part in a 3 week long intensive Norwegian course which turned out to be quite stressful, went to Finland to look some Aalto buildings and began the course around two weeks ago now on the 30th of August. I had intentions of posting week by week but now into our third week I am a little behind. So I will give an overview of the first two weeks in the following posts and then hopefully take up a weekly posting routine.
Norway Blog
I started this blog while studying in Norway taking part in some design and build classes at Uni. Trying to document the process.